Fluid Bed Coffee Roaster v1
The following is a description of my construction project of making a PC controlled fully automatic coffee roaster, and a writeup of the for me most important aspects of the project.
Latest edit: 30/9/2019 (Improved temperature reading in arduino sketch)
Edit: 26/8/2019 (flow optimizer)
Link to youtube of the roaster in action: https://www.youtube.com/watch?v=DfOu7oM3Z1w
https://youtu.be/E2xk2CnljE8
A year ago, I had fun converting a popcorn machine into a coffee roaster, with manual control of heater and fan speed.
It could roast 40-60 grams of beans, a very small batch size,
but it allowed me to get into the mysteries of rosting,
without it costing much on neither equipment nor beans.
After "playing around" with the popcorn roaster for a few months, I decided to make a coffee roaster,
that matched my homes coffee consumption of up to one kilogram of coffee per week, divided into two or three different types of beans.
A drum roaster was considered, but it is a damn complicated building process, and hard to make really good,
so I thought some kind of upscaling of the popper would be the easiest.
This is also the type of coffee roaster that is easiest to roast on,
since you can "turn on a plate" in temperature,
when the roasting proceeds differently than you had anticipated.
On a drum roaster you more or less have to accept,
that the actual roast just didn't turn out quite as you would have liked.
Designchoise
After a bit of hunting around the web, I came across the concept of fluid bed coffee roasters.
A gentleman named Sivetz devised a coffee roaster approx. 50 years ago,
where a lot of air was heated, and then was pushed up through a stationary chamber where the beans resided.
The air then causes the beans to circulate and warms them up simultaneously.
The principle can be freely scaled from 30 grams and up to over 50 kg if space is available
So:
A fan
A heat source
A chamber that can withstand heat
Some control
I found an Italian who, inspired by other people's designs, had lined up something that looked pretty good.
Cyberelectronic he calls himself.
My design is primarily inspired by his design.
What I ended up with, is a total price of 130-200 $.
for a full 100-250 gram coffee roaster with fully automatic profile control.
The following is a description of the construction project, and a review of the for me most important aspects of the project.
Blower/Fan
When reading around the web, it seems the fan is one of people's bigger challenges to make work well in there design.
But the fan in Cyberelectronics's design seemed to work pretty well and it costs almost no money.
https://www.ebay.de/itm/KFZ-12V-75W-Elektrische-Luftpumpe-Elektropumpe-Geblasepumpe-Adaptern-Bootspumpe/302320552900?hash=item4663b58bc4:g:2X8AAOSws5pZHWRD

It turns out that there is a reason why people who used this fan, can later be seen using another fan ...
When people talk about about fans/blowers they often only mention flow/cfm (cubic feet per minute) and ... well, yes, it is a simple way of graduating blowers.
But the real world is not that simple because, if for example a table fan (radial fan) meets resistance,
the flow of air stops and the air just turbulates around the blower wings, not going anywhere.
What is needed to push, e.g. a resistance like beans in a chamber is something like a centrifugal fan, because it can produce a much higher pressure.
It can be designed in three basic ways.
-With the vane blades forward (gives low noise, less flow, and less pressure)
-With the vane blades straight to the side (providing high noise, low flow, and high pressure) and are used in vacuum cleaners.
-With the blade wings pointing backward (gives medium flow and high pressure)
The importance in fluid bed design is probably, that enough pressure can be created,
to lift the the layerhight the beans constitutes,
and at the same time that the flow is sufficiently large for the area of the hole to be blown through at the bottom of the roast chamber to keep the beans circulation ones the pressure has lifted the beans.
If you have a fan that can make enough pressure but has a much larger flow than necessary,
the beans will be lifted by the pressure, and then blow completely out of the chamber.
Conversely, a high flow, low pressure blow will never lift the beans and the flow will never get started.
So it is a balance between flow and pressure capability of a fan that determines whether it is suited in a given design or not.
Read more about the topic here
Large Fluid bed roasters are often built with a vacuum cleaner engine, or the blower type used in whirlpool air bubble blowers.
Some vacuum cleaners are better suited than others (for the given design),
and finding a combination of roast chamber height,
diameter and bottom hole diameter to match the fan selected can be challenging.
The air mattress pump I linked to above is a Powerlite Industrial Limited PL-8103 12 volt 75 watt Pressure: 0.55PSI / 3.8kPa Flow: 300Lmin / 18m3h.
It has backwards wings and can lift >350 grams of beans and keep them in circulation, in a chamber with an inner diameter of 7.8 cm with a bottom hole diameter of just under 3 cm.
Since it is only 75 watts (about 6.5 amps at 12 volts) the power supply needed for it does not have to be super large and the speed regulator for it becomes very cheap.
I've experimented quite a deal with the voltage of the fan.
Although it is said to be 12 volts, it requires a great deal of ventilation inside to keep it from overheating (since they by design blocked some of the blower motors inhearent ventilation holes).
The manual for it also states that you should not use it for over half an hour (and even that is way longer than you can in the long run).
With 12.5 volts it smells burnt after 12 minutes!
Since I would like to make several roasts one after the other, I had to turn down the voltage for it,
which reduces the heat generation in the motor considerably and the efficiency slightly.
At 10.5 volts, it does not become nearly as hot and can still be used for at least 230 grams of beans.
However, I found that the coal that transfers the energy to the coil in the motor deposits a lot of coaldust and arcs a lot in the copper to which the energy is delivered from the coals.
The fan motor therefore dies after 15-30 roasting.
Lessens learned: Use a much higher quality brush motor fan or use a brushless motor fan.
In the past few years, Makita has actually changed to brushless for the same reason; Higher reliability.
I have therefore purchased this KR9250-12-220-S200 Brushless Fan https://www.aliexpress.com/item/32608348455.html
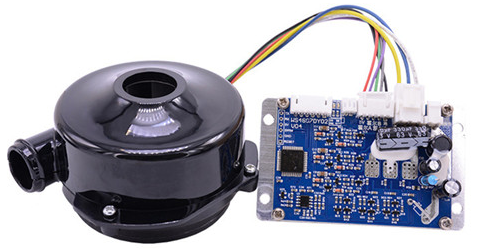
Pressure: 1PSI / 7kPa Flow: 800Lmin / 48m3h Power max 168 watts
As can be seen, it is a little more powerful and it also produces less noise. Unfortunately, the price is 5 times higher, partly because brushless requires a driverboard.
It is rated to be able to run continuously for 8 hours before having to cool off for an hour.
Plenty of run time for a home setup.
As flow in relation to pressure is a little too high, some beans blow out the top of the roasting chamber when turned up to where the beans begin to circulate.
Ideally, the flow should be lower compared to a pressure of 1PSI, perhaps closer to 300-600Lmin.
Probably WS7040-12-X200 (Pressure: 0.8PSI / 5.5kPa Flow: 220Lmin / 13m3h) or WM7060-12V (Pressure: 1.6PSI / 11kPa Flow: 520Lmin / 31m3h) are better alternatives, BUT:
You can also solve it by making a restrictor/damper in the passage of air from the blower to the beans, and that proved to have a huge advantage in this design.
This technique maintains the air pressure while limiting the flow.
This is exactly the same way that the gicleur restricts the flow of water in an espresso machine without limiting the brewing pressure.
Ideally, the beans should be lifted enough by the pressure to start the circulation, and have a flow so low,
that as soon as the beans come free of the bean mass, they topple over to the sides of the roasting chamber.
When the airflow is lower, less energy is required from the heater and fewer BTU (energy) passes through the beans.
Thus, there is less risk of scorching the beans, and you get a much more even roast.
I've been experimenting with putting a damper on the outlet of the fan, which worked, but I felt it could be better. The air had a slight tendency to make a hole in the middle of the bean mass where it blew through without drawing any beans up with it. So I thought the solution might be to force the air into a circle. Then it would be easier to push the beans up. Various sizes of washers were attached to the outlet of the heating element tube, and eventually I found one that gave the perfect result.
https://youtu.be/E2xk2CnljE8
Heat source
Large-scale fluid bed roasters often use a gas burner to deliver sufficient BTU (energy) to the air.
If a fluid bed roaster is built on a smaller scale, an electric heater is sufficient.
Expect approx. 650 watts per 100 grams of beans. That will get you in the ballpark of what you need, and give a slight surplus in the design.
I bought a heat gun on e-bay https://www.ebay.de/sch/i.html?_odkw=einhell+2000w&_nkw=einhell+2000w+Hei%C3%9Fluftpistole&_sacat=0
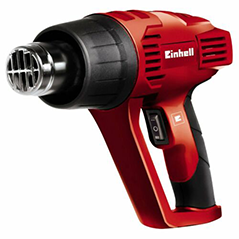
Specs says 2000 watts, but in practice it ends at around 1700-1800 watts.
The heater was removed and carefully disassembled.
I had to get rid of the little fan motor in it, and it is often wired in series with at least one of the heating coils.
In addition, it had two heating levels to choose from on a switch.
The fan was removed and the two coils with the greatest electrical resistance were placed in parallel.
The two parallel-connected coils were then set in series with the heat coil having the least resistance.
Eventually it was all gently reassembled.
A ring was cut out of MDF wood and sanded down,
so that it fitted as an adapter between the inlet of the heating tube and the top of a plastic water drain angle that connects to the outlet of the fan. It's made with a tight fit. It looks unstable, but in reallity is very steardy.

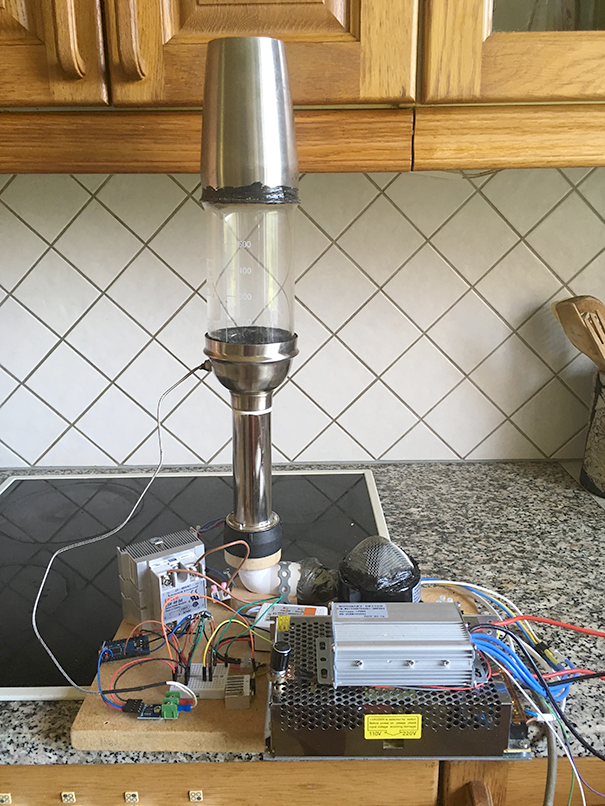
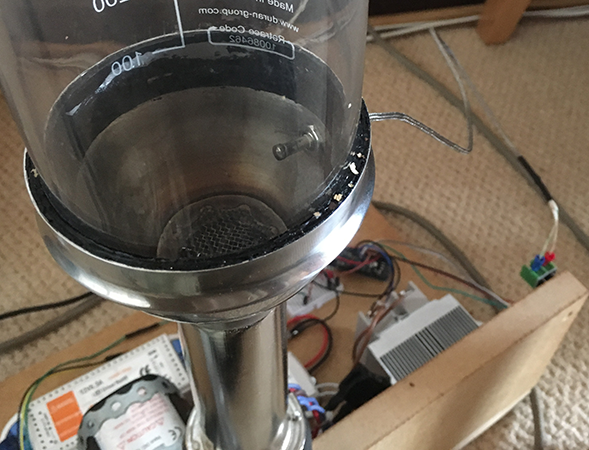
Roasting Chamber
It is convenient to be able to see the beans while roasting.
It allows you to follow the progress of the roast and take notes of the different stages the bean pass through as they develop.
A popular solution is to buy a bake-a-round and use the glass tube.
I chose a slightly smaller solution in the form of the same type of glass used in a frenchpress.
https://www.frederiksen-scientific.dk/webshop/laboratorieudstyr/glasudstyr/baegerglas/baegerglas-hoej-form-duran/600-ml-82-mm-143-mm
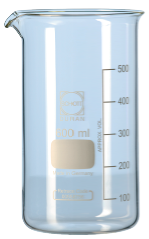
It is sufficiently high and has an internal diameter of 7.8 cm.
The bottom was cut off so that the glass became a tube.
I used a diamond disc dremel for the task, but there are other ways to do it. Search on youtube.
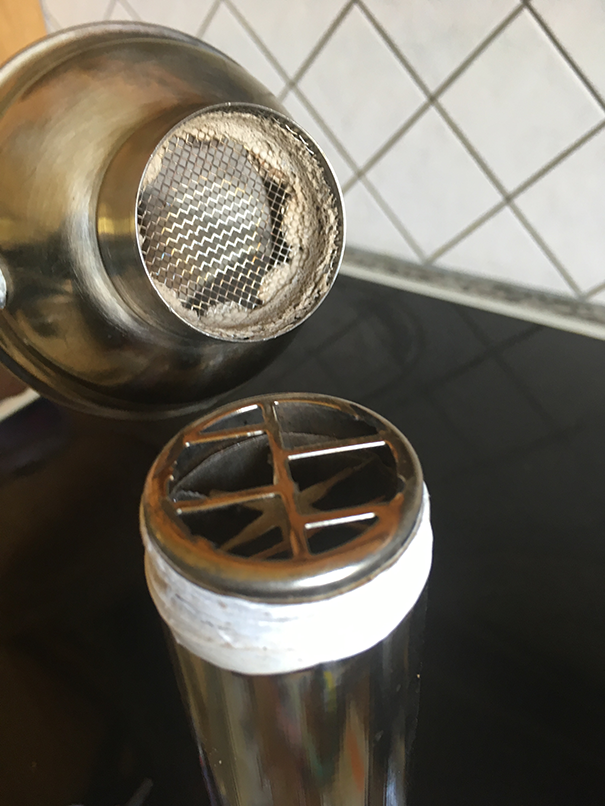
The bottom of the roasting chamber must have a shape that fits the glass,
fits the tube on the heater and helps the beans to circulate up in the airflow and down outside the airflow.
For the 8.2 cm outer diameter that my glass tube had, the top of a cocktail shaker fits perfectly.
I found a 50 cl with a sufficient internal diameter 8.6 cm at https://www.mixmeister.dk (discontinued)
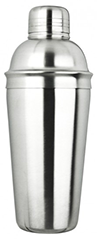
It has a side-to-bottom rounding (turned upsidedown),
which helps the beans to slide nicely into the upward flow of air in the middle.
The ratio between the diameter of the supply hole and the diameter of the glass also fits within what works to get good circulation.
Its inner diameter is also large enough to allow for a layer of high-temperature silicone between the glass and the shaker top.
https://www.bauhaus.dk/silikone-40-ml-300-c-casco.html
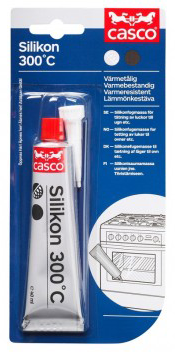
A soft buffer is important as glass and steel do not expand at the same rate (I found out).
You can't get foodgrade silicone that can withstand the temperatures it is exposed to in this setup,
but that does not matter as the beans do not come in contact with the silicone.
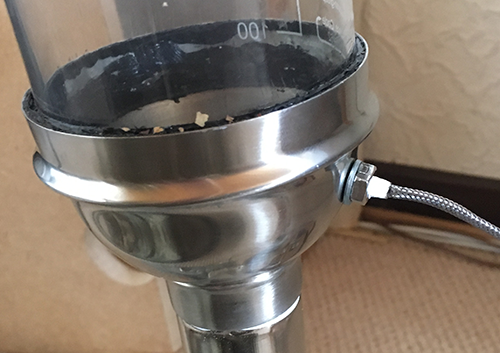
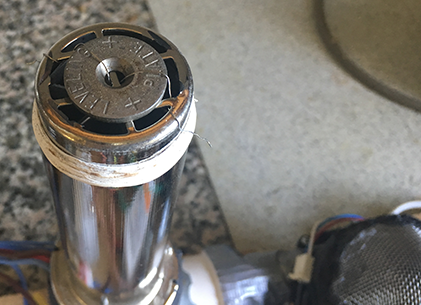
The shaker inlet hole is slightly larger than the tube on the heater.
By wrapping Teflon tape (for sealing water pipe joints) a few times around the top of the heater tube, they fit nicely together and are fairly airtight.
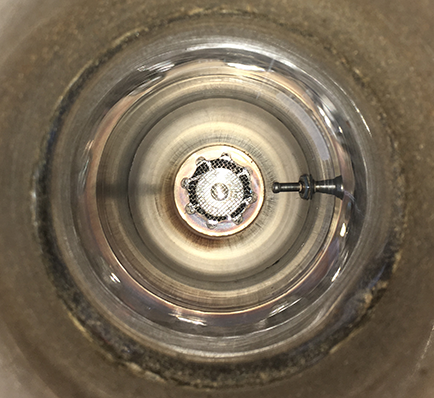
Usually a perforated plate sits in the inlet of the cocktail shaker.
It has too few holes for the airflow needed in the fluid bed.
So most of it was cut / sanded away and a mesh from a sieve from the local supermaked was glued in.
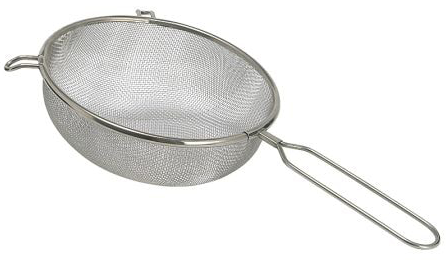
https://www.hedestoker.dk/4310_varmefast_lim_thermic_1100_gr.html

A hole was drilled in the side of the shaker so that a temperature sensor could be inserted later.
It is important that the temperature sensor is placed well into the bean mass,
but it must not be in the upward flow of air in the middle,
since that would show the temperature of the heated air more than the bean temperature itself.
The place I mounted the sensor is good, with some modifications. More on this later.
The top (originally bottom) of the cocktail shaker had the end cut off to form a tube.
This can then act as a roasting chamber extension so the beans do not fly out.
The edge of it where it meets the glass edge got a line of silicone.
Elektronic control
Some people build the control so it can run independently of a PC, either in manual mode or automatically.
Automatically, means to put a coarse roasting profile with few sub-temperatures into the control,
and then the automation controls the heater so that sub-target temperatures are reached at the right times.
I have opted out of such a standalone solution as no roast profile fits all bean types.
I wanted to be able to log the roasting on PC,
and most preferably be able to create many detailed profiles on the PC,
which it could automatically follow.
This allows me to roast a new type of bean in many different ways,
choose the profile that suits the bean best when cupping,
and then let the automation use that profile for that paticular bean whenever I want to roast it.
I preferably have 3-6 green bean types lying around and always have at least two types in use for espresso, V60 or cold brew.
I have done several different hobby projects with Arduino over the last few years.
It is a wonderful little super cheap microcontroller that is almost always powerful enough for all the small tasks you can find in everyday life at home.
Cat-on-Kitchentable Alarm, timer on the Mazzer Major Grinder, Pill and Oxygen Control on the stokerheater,
Methane gas sensor behind the toilet to turn on the exhaust fan :-D, Air / temperature control on a Weber oven etc.
So controlling a fluid bed coffee roaster should be an easy task for the Arduino.
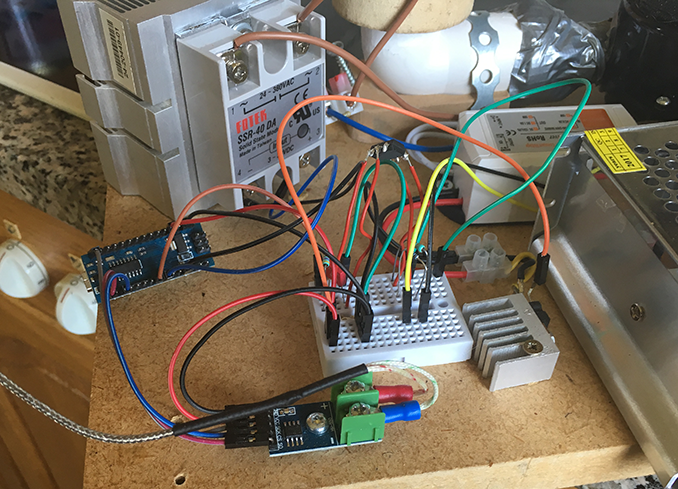
I ordered the parts from Aliexpress for almost no money and free shipping.
-Arduino Nano
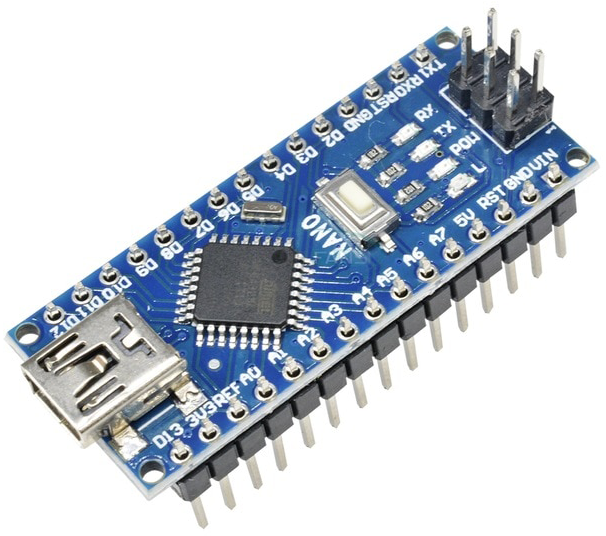
-K-type thermocoupler w. max6675 sensorcircuit
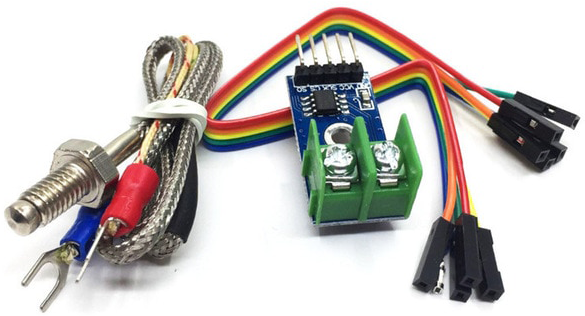
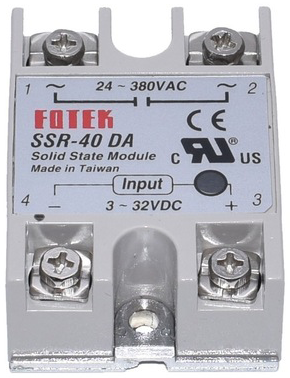
-SolidStateRelay 40 Amp, in reallity a 25 Amp inside (after all it is chinese)
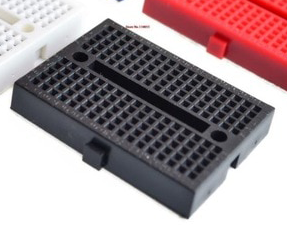
-A breadboard to build upon.
-A handfull of dupont connection wires
-A 12 volt powersupply, at least 14 amp for the blower
-A small 12 volt powersupply, at least 0,5 amp for the Arduino and elektronics
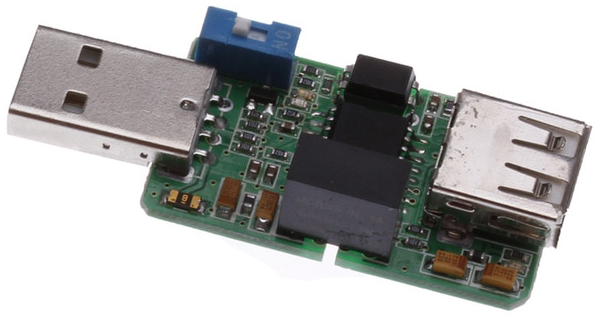
-A USB isolator so that the PC and Arduino are electricly separated
The rest of elektronic parts i ordered from https://elektronik-lavpris.dk
The schematic diagram for the elektronics can be seen here
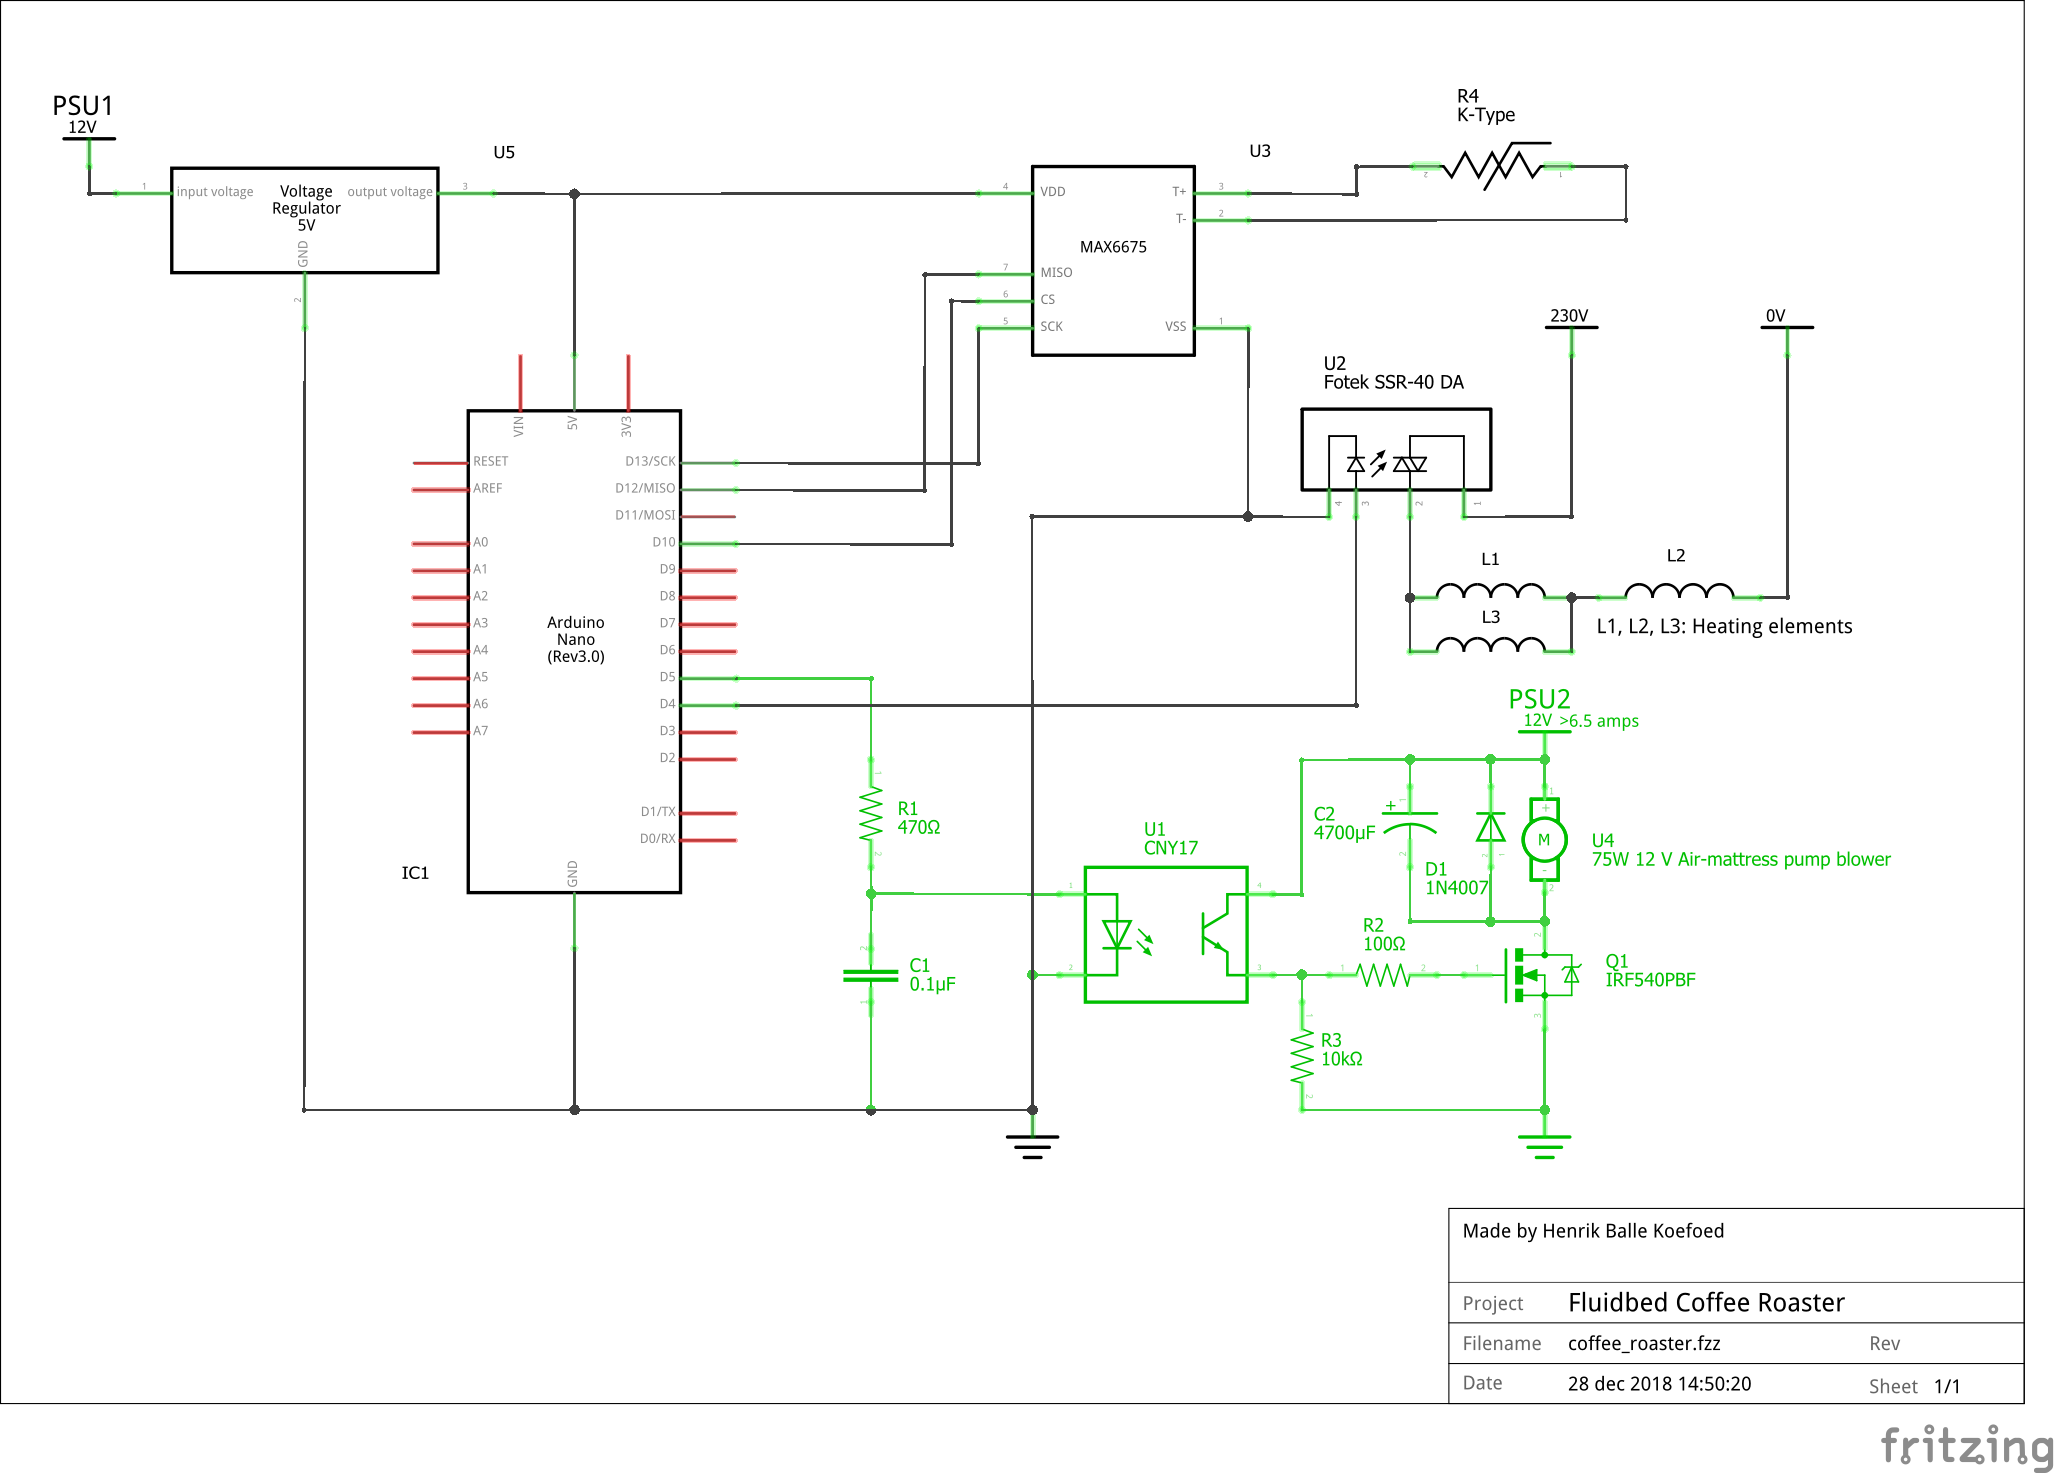
Description:
The USB port on the Arduino is at the other end connected to the PC's USB port.
The Arduino can then deliver temperatures to the PC,
and in return get instructions on what fan speed and amount of heat it should perform.
The K-type thermocouple (heat sensor) is shown in the upper right corner.
It is connected via wiring to a small print with a MAX6675 IC circuit on.
It is then asked via the Arduino's pin D10, D12 and D13 to deliver a temperature,
which the Arduino via USB delivers to the PC software.
Once the Arduino has been instructed by the PC on how much the heater should be set on,
pin D4 is turned on and off for a shorter or longer period of each second.
This causes the SSR relay U2 to turn on and off 230 volts for the heater (L1, L2 and L3).
If you choose a brushed DC motor fan like I did in the beginning, you can build the green section on the diagram to control the fan from the Artisan software:
Once the Arduino has been instructed from the PC at what speed the fan should be running,
it works pretty much the same way as for the heater but with a much faster on / off cycle.
The output pin D5 turns on and off, but instead of using a SolidStateRelay it is built with discrete components,
since an SSR does not work on a DC voltage like the 12 volt fan uses.
The U1 optocoupler is used to electrically separate the fan and its on / off electrical noise,
from the more delicate Arduino and temperature sensor.
For the same reason, the fan runs on a separate power supply.
Q1 gets hot !!! After all, it handles up to 6.5 amps, so it needs to be on a heat sink.
The heat sink I used is almost too small.
D1 is HIGHLY!!! important (I discovered) Read more here: https://en.wikipedia.org/wiki/Flyback_diode
Also, it might be a good idea to mount two capacitors on the motor as described here: https://www.pololu.com/docs/0J15/9
Originally, there is already one capasitor between the terminals,
but extra capasitors from each terminal and to the motor housing will further reduce the electrical noise,
which can never hurt and will only minimize the risk of problems.
The driver board for the brushless fan I'm using now, has a potentiometer to control the fan speed. But it is also possible to let the Artisan software control the speed via the fan output on the Arduino.
However, I haven't done this yet.
The location of the temperature sensor is a bit of a challenge as it should preferably be deeply buried in the bean mass ... and only that.
If you push it all the way into its neck collar, the end of it reaches into the hot air flow from the heater and meassures a great deal too high a temperature.
If you pull it back in the back of its neck collar, it will to a lesser extent follow the temperature of the beans,
and, to a greater extent, the steel temperature on the bottom / shelf of the cocktail shaker.
I found a solution where, with a dremel, I removed just over a third of the neck collar,
screwed the neck collar into the hole with a spacer on the outside,
and a half-thickness nut on the inside (dremel again).
Then I pulled the sensor out as far back as possible,
wrapped 5-6 turns of teflon tape around the exposed part of the sensor,
and pushed it back into its neck collar.
Later I have given it a lump of silicone on the outside for it to be completely stable.
Now it does not reach too far into the bean mass, but far enough,
and as much as possible of it is exposed to the beans.
It is thermally and electrically insulated from the steel hopper in which it is mounted.
It works perfectly and provides temperatures that are quite close to what is correct (roughly 152C yellow, 190C FC).
The overall design can be expanded with more temperature sensors or multiple control outputs without major challenges.
I also made the software so it is relatively easy to expand if you need to.
You can also buy a circuit that resembles this circuit, but with all of it builtin on the circuitboard.
It's called Arduino TC4, but it's almost never available,
as is today only made by various private individuals in very small batches, and very rarely.
.
PC software
As PC software for the task I chose Artisan Roaster Scope.
It has the largest hardware support, is the most widely used, and most active development of the software.
Among the forms of communication for external hardware, it has support for MODBUS, which is one of the larger industry standards.
MODBUS is also pretty easy to use on an Arduino (I found out), on with the programming gloves and:
Arduino software
Here I will only provide a link, as I have commented a lot directly in the text in the program text file.
Even people with very little programming experience can follow what goes on in the program.
The file can be opened in a text editor such as notepad or wordpad if you are curious to see the program.
But otherwise it must be opened in the Arduino IDE programming environment if you want to put it into an Arduino.
In that case, a library (support program) must also be downloaded so that the program can talk with MAX6675,
and a library responsible for MODBUS communication.
Links to both are at the top of the program text file.
http://www.sinobi.dk/henrik/kafferister1/coffeeroaster.ino
Setup of Artisan
Follow pictures of setup menues and you should be good to go
You can find the best online HTML, CSS and JS tools at html-css-js.com: editors, code optimizers and more.